
Brevo for Beginners: Learn to Create an Email Campaign

Brevo makes email marketing simple for beginners. This step-by-step guide shows you how to create your first campaign, import contacts, use templates, and launch with ease.
Email marketing doesn’t have to be complicated. Learn how to create your first campaign with Brevo, step by step
If you're just starting out with email marketing, you've probably come across Brevo (formerly Sendinblue), one of the most beginner-friendly marketing software solutions currently available. Known as a highly intuitive SaaS (Software as a Service) solution, Brevo is tailored specifically to help small business owners, marketers who are new to email promotions, and job-starters instantly create and manage effective email campaigns.
I've personally worked on several email marketing solutions, and I find that Brevo is uniquely perfect for beginners, due to its simplicity, powerful yet easy-to-learn automation, as well as transparent & cost-effective pricing model. What also makes it stand out is the way it balances ease of use with features you can actually grow into, so you won’t outgrow it after just a few campaigns.
In this guide, I'll show you exactly how easy it is, even if you've never executed an email campaign before. Let's dive straight into it.
What is Brevo?
Brevo is an easy-to-use, cloud-based email marketing and communication SaaS adapted for companies looking for an all-in-one marketing platform. Initially known under the name Sendinblue, Brevo stands out among competitors for being accessible even without deep technical marketing skills. Brevo effectively handles multiple digital communications channels, including email marketing, newsletters, transactional messages, SMS outreach, marketing automation workflows and much more.
Its main advantage for beginners lies in simplicity coupled with generous functionalities. Without coding skills or extensive training, one can quickly design and launch impressive email campaigns.
For example, a small business owner can effortlessly send monthly promotional newsletters, special discount offers or event invites to its customer base within a few clicks using Brevo.
Why Should Beginners Use Brevo for Creating Email Campaigns?
Here are 5 straightforward reasons why Brevo represents an ideal starting point:
- User-friendly interface and builder: no coding or design expertise is needed,
- Affordable & accessible for beginners: the free tier allows sufficient space for practice,
- Highly reliable deliverability rates: great chance your emails reach primary inboxes instead of spam folders,
- Access beginner-friendly email templates: beautiful premade emails makes crafting professional campaigns easier,
- Strong yet straightforward automation features: easy-to-launch follow-up emails ensure long-term engagement with minimal effort.
Taken together, these features make Brevo a practical choice for anyone learning the ropes of email marketing. It lowers the barriers that often discourage beginners, while still offering tools you can build on as your campaigns become more advanced.
Getting Started with Brevo: Step-by-Step Guide
Now, let’s walk step-by-step through creating your first Brevo email campaign. Below, I’ve outlined each essential task clearly and practically, making sure it’s easy to follow, even if you have zero past experience. We'll use screenshots along the way for additional clarity.
Step 1: Create Your Brevo Account and Complete the Initial Setup
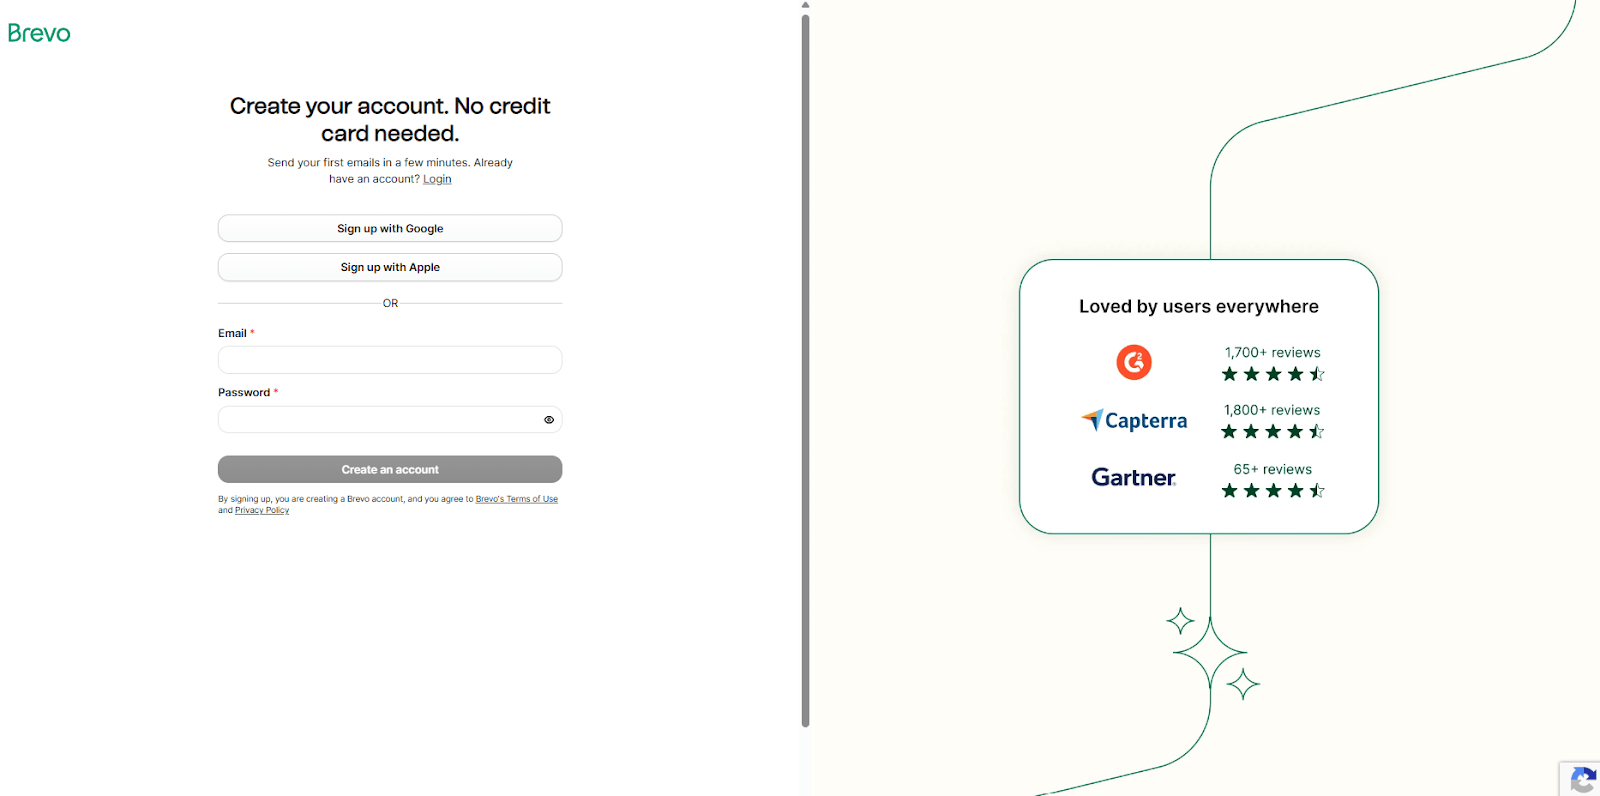
First things first, create your Brevo account:
- Head to Brevo’s signup page and enter basic information (email, password).
- Confirm your account through the verification email you'll immediately receive.
- Complete your profile setup clearly by providing personal or business information, as prompted.
Brevo recommends validating your sender domain by configuring SPF and DKIM records to improve your email deliverability and prevent emails ending up in spam folders. Don’t worry, Brevo provides simple guidance during setup.
Step 2: Import Your Email Contacts Quickly and Easily
Building a well-managed contact list is crucial to email marketing:
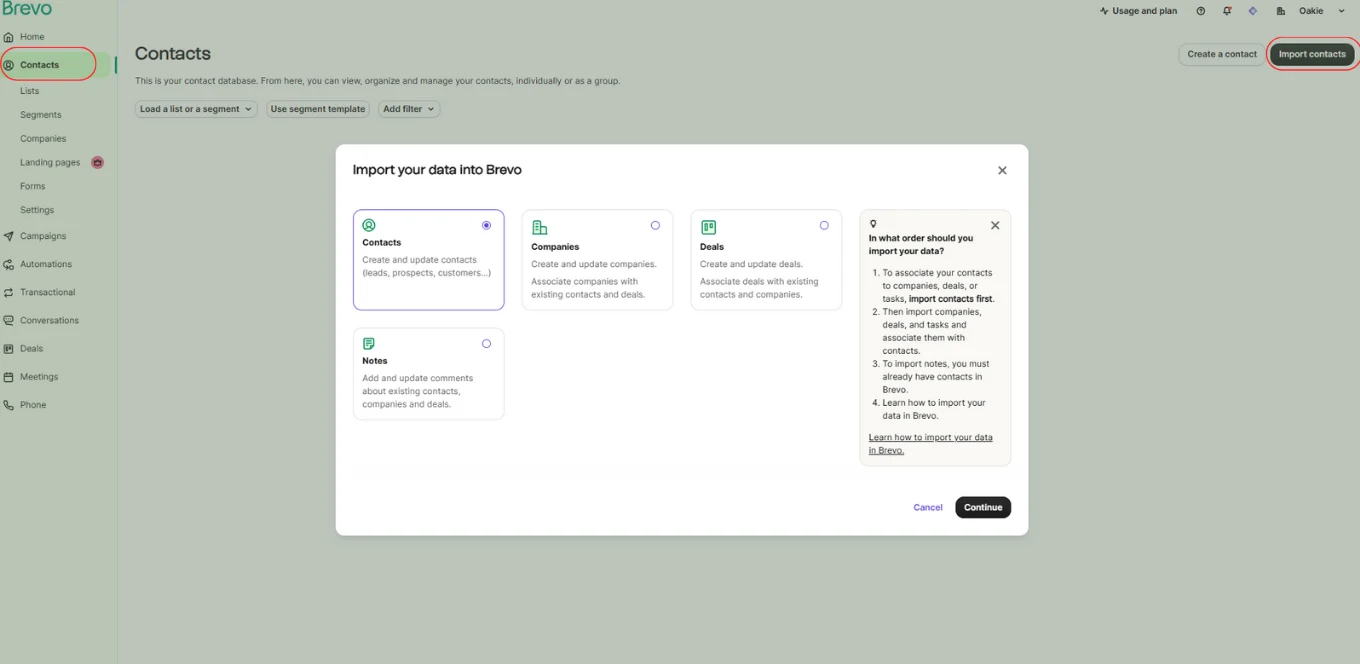
- Navigate to the "Contacts" tab on your Brevo dashboard.
- Click "Import Contacts" then upload a CSV or Excel file (which clearly lists subscribers' names, email addresses, etc.).
- Brevo guides you simply in mapping the columns automatically, ensuring accuracy and convenience at each step.
Keep in mind: Always check Brevo’s GDPR and anti-spam compliance recommendations before importing contacts.
Step 3: Create Your First Email Campaign on Brevo
Once your contacts are imported, you’re ready to create your first email campaign:
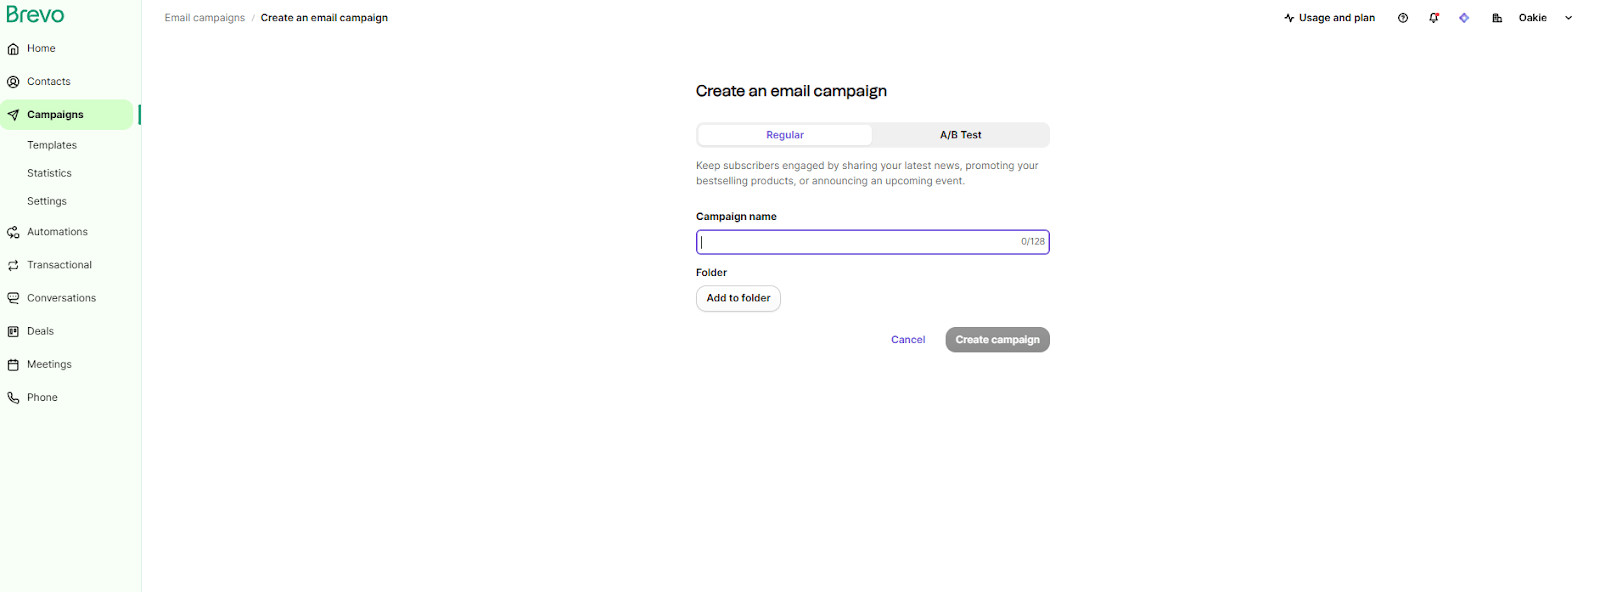
- Select "Campaigns" on the main menu, choose "Email," and click "Create an email campaign."
- Give your campaign a clear name and set your email subject line, sender name, and reply-to address.
- Ensure all details are clear, accurate, and recognizable to your audience.
At this stage, you’ve laid the groundwork for your campaign, and setting these details properly helps build trust from the very first email you send.
Step 4: Select and Personalize Email Templates (Without design skills)
Next, personalize your campaign for your audience with Brevo effective templates:
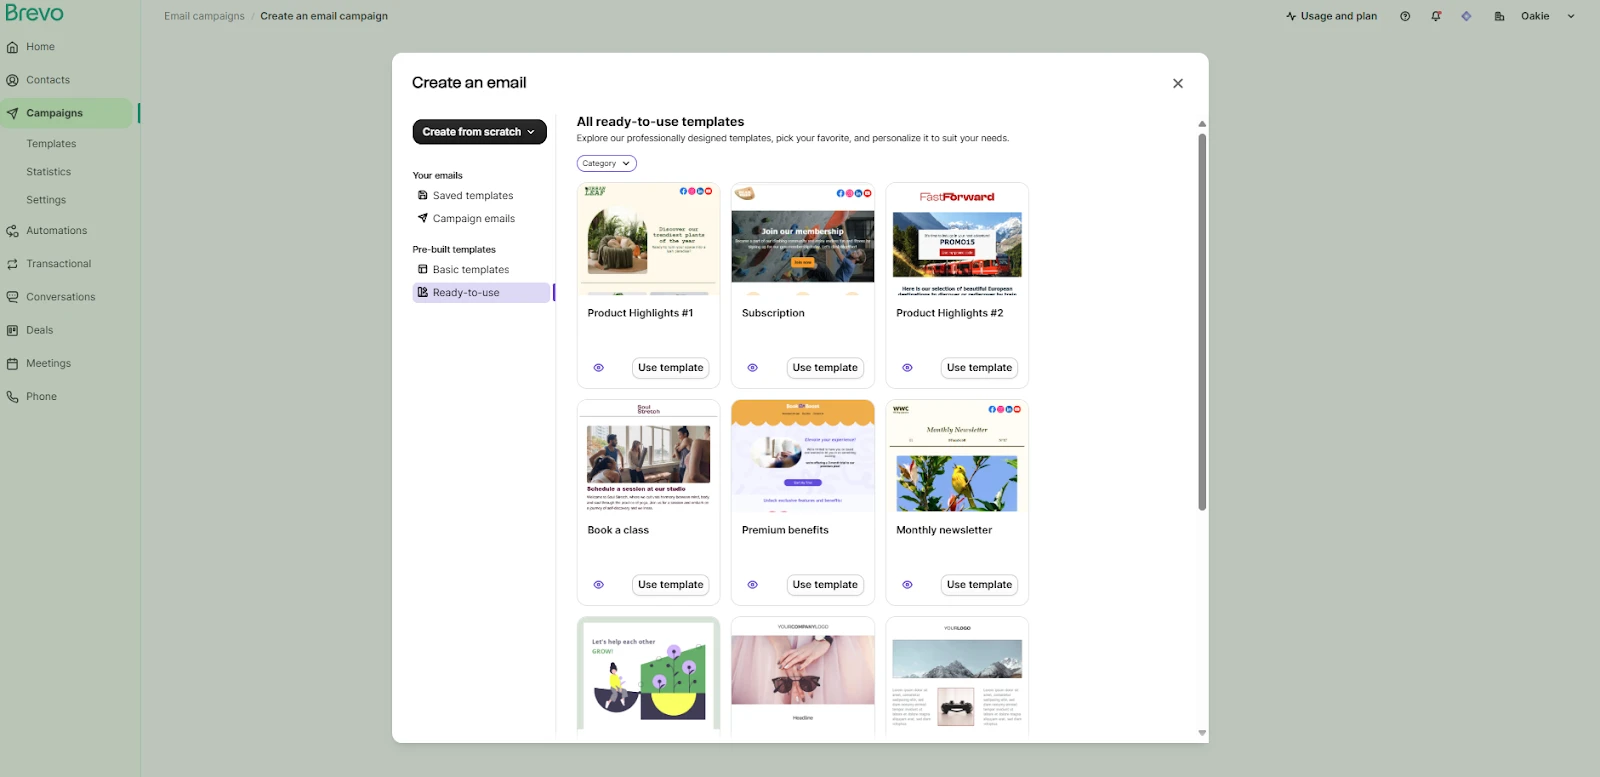
- Review Brevo’s professionally-designed library of ready-to-use templates. You can sort templates by theme, industry, or design type.
- Use Brevo’s intuitive drag-and-drop editor; no design experience is needed. Simply add text, images, CTA buttons, and branded content easily within minutes.
- Preview clearly how your campaign renders on desktop and mobile screens.
Tip: It’s also worth previewing your design on different devices and testing small variations, like subject lines or button text, so you can see what resonates best with your subscribers right from the start.
Step 5: Test, Schedule, and Launch Your Email Campaign
Before sending your email out, a careful final check is crucial:
- Use Brevo's test function ("Send a Test email") to view your campaign exactly as subscribers will see it in real inboxes.
- Correct typos, properly formatted images or links if necessary.
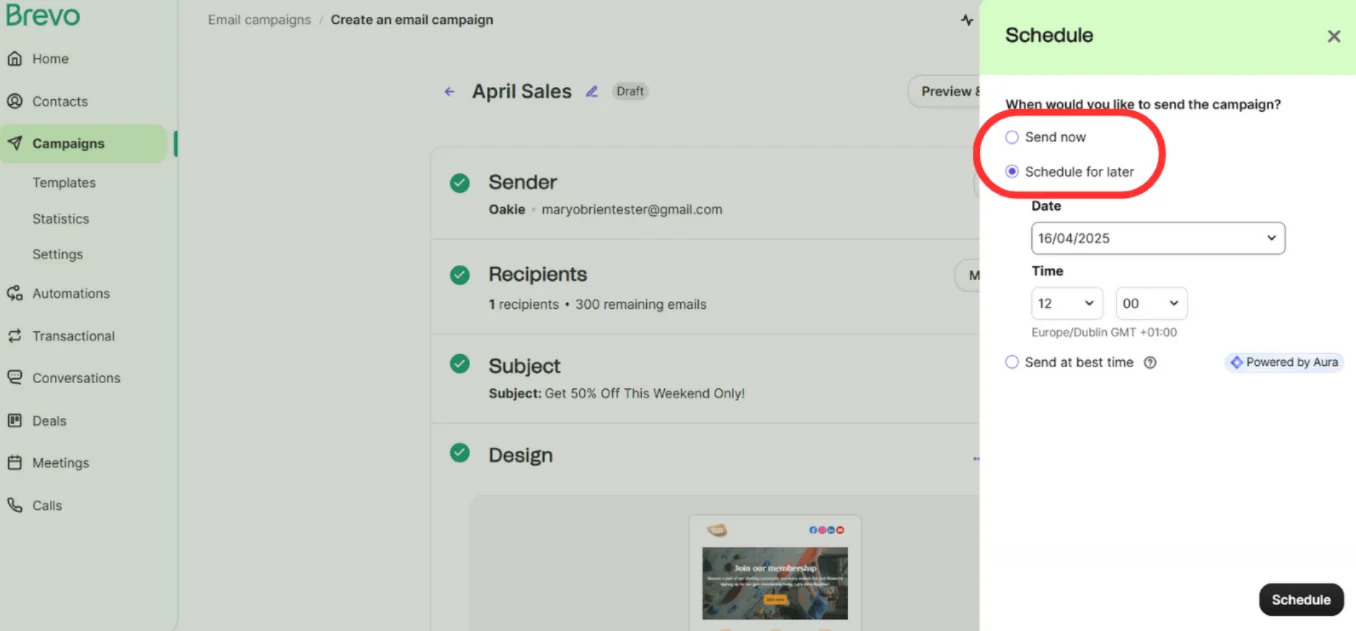
- When you're satisfied, choose your sending option: set as immediate release or conveniently schedule future send-out automatically in Brevo's calendar.
Congratulations! Your first Brevo email campaign is now ready to go. Relax, press "Send," and watch your email marketing confidently take off.
How to Use Brevo for Successful Email Marketing?
Brevo provides tremendous features that are powerful and simple to gain the understanding to create regular and successful email marketing campaigns. I have seen many beginners start out with their very first campaigns and I value these recommendations to learn as quickly and efficiently as possible to use Brevo.
Segment Your Audiences Intelligently
Properly categorizing your contacts can dramatically increase your email performance. Leveraging Brevo's segmentation capability, in your dashboard you can use the segmentation interface and separate your contacts by shared traits, behavior or interests.
Here are some examples of segments you could use:
- Recent customers, to boost repeat purchases
- Newsletter subscribers, to nurture regular engagement
- Users who haven’t interacted recently, targeting re-engagement efforts
Good use of segmentation can instantly increase the relevance of your emails and it can increase your open and click rates a significant amount.
Personalize Your Email Content
Brevo's easy personalization features noticeably improve campaign results by ensuring emails resonate personally with recipients. You can quickly add dynamic fields based on subscriber info.
Some beginner personalization ideas include:
- Using subscriber names (eg: "Hello John!")
- Sending special birthday or anniversary discount messages
- Follow-ups based on a user's browsing behavior on your website
Personalized messaging boosts trust, making subscribers far more likely to open, read and click within your emails.
Set Up Beginner-Friendly Email Automation
Automating emails saves tremendous amounts of time while keeping your audience flawlessly nurtured and engaged.
Simple automation workflows you can quickly deploy in Brevo:
- Automated welcome emails immediately after signup
- Abandoned-cart reminder emails to recover potential sales
- Scheduled event reminders and promotions (e.g., Annual Sales, Holidays…)
Brevo Automation tools simplify the entire set-up process, meaning beginners gain impressive results remarkably quickly and hassle-free.

Track Essential Necessities Clearly via Analytics
Brevo’s simplified analytics dashboard provides concrete insight enabling steady improvement of your email marketing strategy.
Pay specific attention to:
- Open rates: Quickly evaluate and perfect your email subjects
- Click rates: Discover if the email content effectively engages subscribers
- Bounce rates: Alternatively manage your contact list quality and ensure deliverability
By regularly checking your analytics, you tackle precisely what works or needs adjustment, guaranteeing steady improvement of your email performance.
Following these straightforward and actionable beginner's recommendations will significantly enhance your email results using Brevo, making sure every campaign is smarter and delivers greater success.
Create Your First Newsletter with Brevo
Now let's go through a simple yet realistic example for a beginner - creating a newsletter in Brevo. Plus, I'll walk you through it step-by-step in addition to clearly illustrating the setup process.
Let's say you have a bike shop in your community, and you want to create a friendly newsletter for your subscribers once a month that keeps them updated on new items, cycling tips, and community cyclists events.
Here is an actual example of the simplified process with Brevo to create your newsletter easily and quickly:
Step 1: Start Your Campaign
- Log into Brevo.
- Open the Campaigns dashboard and click "Create an Email Campaign."
- Clearly name your newsletter, e.g., "March 2024 - Bike Shop Updates."
Step 2: Choose the Right Newsletter Template
- Browse through Brevo’s selection of mobile-friendly and beautifully designed newsletter templates appropriate for beginners.
- Select a simple and engaging layout that suits your branding style, one reflecting clearly identifiable sections like introductions, simple news wrap-ups, featured products, and upcoming events.
Step 3: Customize Easily with Drag-and-drop
Use Brevo’s intuitive drag-and-drop editor to insert your content into the newsletter structure effortlessly:
- Header: Add your shop logo clearly at the top.
- Introduction: Write a concise, warm greeting message for subscribers.
- Featured Section: Include engaging content, such as recent arrivals, top-selling product recommendations clearly relevant to that month's theme.
- Event Updates & Community Highlights: Clearly outline upcoming spring cyclist events or community meetups.
- Call-to-Action Button (CTA): Encourage clear reader action, such as visiting your website, registering for events, or checking special deals.
No technical skills? No worries; the customization editor makes it straightforwardly achievable.
Step 4: Test, Verify and Send
- Utilize Brevo's "Send Test Email" option, reviewing how it visually appears within real inboxes.
- Verify that links direct accurately to the correct content and ensure the newsletter displays attractively on desktop and mobile clearly.
- Finally, schedule confidently using Brevo’s built-in calendar for strategic sending moments.
In just a few straightforward steps, without design or technical marketing experience, you’ve created your bike shop’s first professionally engaging email newsletter successfully!
Brevo Pricing: Top Recommendations for Beginners
Brevo provides a number of pricing plans that flexibly scale with your needs. Here's a short summary of their plans geared for beginners:
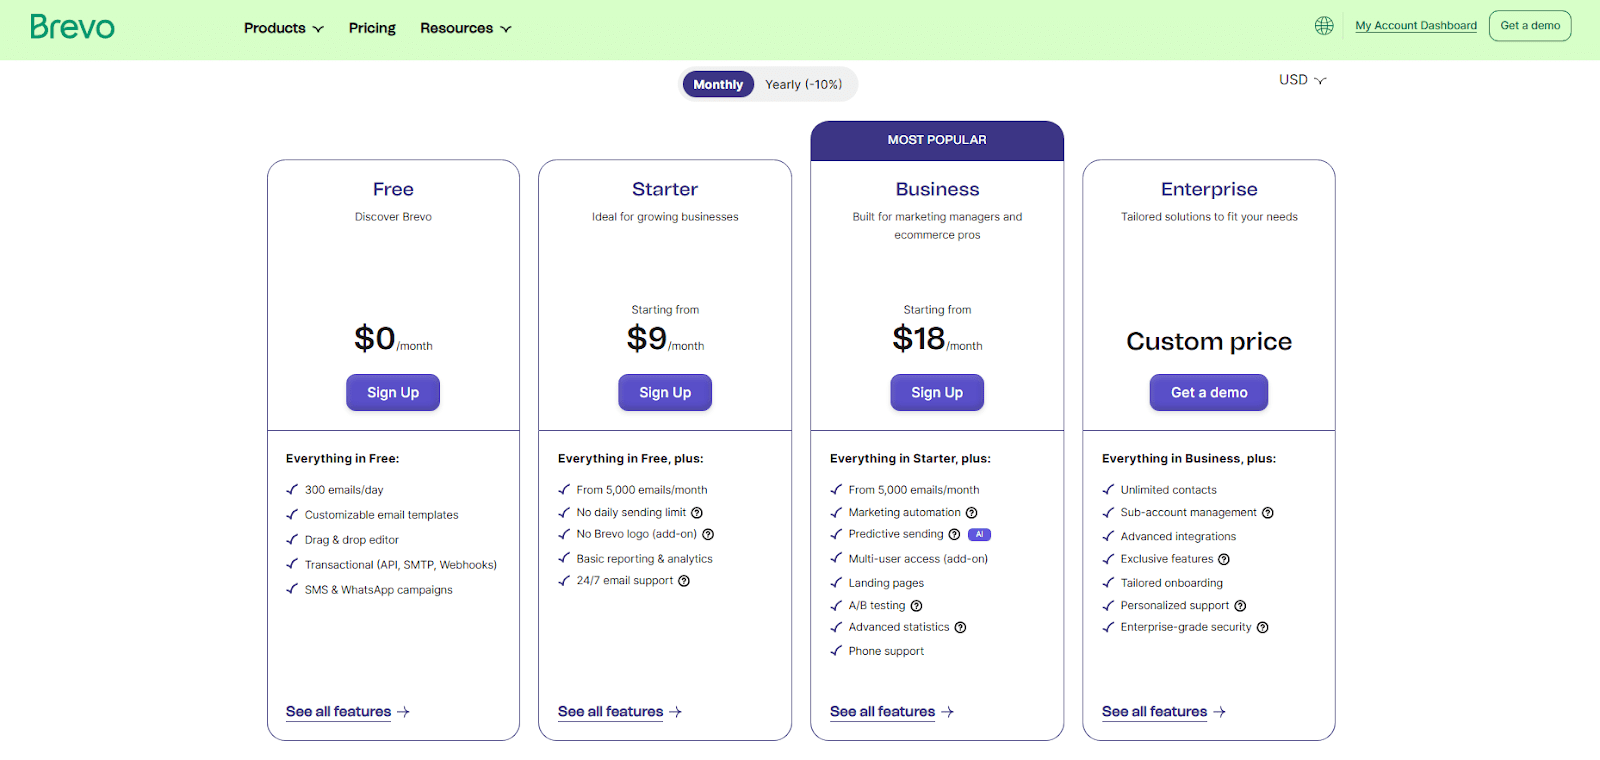
- Free Plan: Perfect if you are just getting started. It offers 300 emails per day for free, which is great for small, informal campaigns or practicing basic email marketing skills without any financial commitment.
- Starter Plan (from $9/month): Intended for novice marketers who are ready to step up into the next tier. It offers more emails per day (5,000 emails per month and up), basic reporting features, and most importantly Brevo branding removal from your emails.
- Business Plan (from $18/month): Intended for those who are growing into a serious email marketer. It offers advanced features like advanced reporting, A/B testing, marketing automation, and even further email delivery volume increases.
Recommended Option for Beginners:
In my experience, the Free Plan is perfect if you're initially exploring email marketing with Brevo. After gathering experience and building confidence, you can smoothly transition to the Starter Plan to leverage expanded functionalities without breaking the bank.
Brevo frequently offers discounts and special promotions ideal for newcomers, so make sure to check out our exclusive offers and discount codes on the Brevo pricing page to save and get the most out of your investment!
Brevo Beginner’s FAQ
Is Brevo good for email marketing?
Yes, Brevo is an excellent choice for beginners looking to create professional email campaigns easily. Its key advantages are an intuitive drag-and-drop editor, pre-designed templates, simple email automation tools, and reliable deliverability, all perfectly suited for new marketers.
As a beginner, should I choose Brevo or Mailchimp?
Both Brevo and Mailchimp are beginner-friendly. Choosing depends on your priorities:
- Brevo: Recommended if you're seeking simplicity, straightforward automation, multilingual support, and better pricing, especially in the free and entry-level tiers.
- Mailchimp: Preferred if your primary focus is brand recognition, extensive integrations, and extensive template options.
From my experience, if simplicity, affordability, and ease of start matter most, Brevo is typically the strongest choice for beginners.
How many emails can I send for free with Brevo?
Brevo provides an attractive free-tier perfect for beginners allowing you to send up to 300 emails per day (approximately 9,000 monthly emails). This generous offer ensures ample room for experimentation, regular emailing, and initial campaigns without additional cost.
Can I easily automate my email campaigns using Brevo?
Absolutely! Brevo provides highly intuitive email automation workflows specifically designed for newcomers. You can set up sequences quickly to automate your welcome emails, follow-ups, promotional messages, or reminders, allowing you to build professional sequences with zero technical skills and significant time savings.
Ready to Launch Your First Email Campaign With Brevo?
Congratulations, you've now learned all the essential basics to confidently tackle your first email campaign through Brevo! As we've seen, Brevo stands out as an incredibly user-friendly, accessible, and beginner-focused solution that simplifies email marketing from A to Z.
Personally, I've accompanied many marketers during their early steps into email communication, and few platforms make getting started quite as seamless and enjoyable as Brevo. Now it's your turn: explore, experiment freely with the free plan, or consider upgrading if you grow rapidly. As you continue, keep an eye on results from your very first campaigns. Even simple adjustments to subject lines or send times can noticeably boost engagement, and Brevo makes it easy to track these insights without getting overwhelmed.
I recommend you grab our exclusive Brevo promo code and discounts to effortlessly start your marketing journey today. To make things even easier, Joinsecret offers you an exclusive Brevo promo code to kickstart your journey with valuable savings.
Wishing you a successful and fulfilling experience creating your first email campaign, start now and watch your audience engagement rise significantly with Brevo!
{{cta-marketplace="/blog-elements"}}